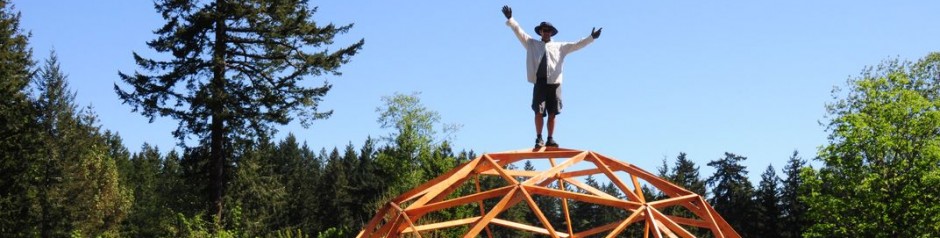
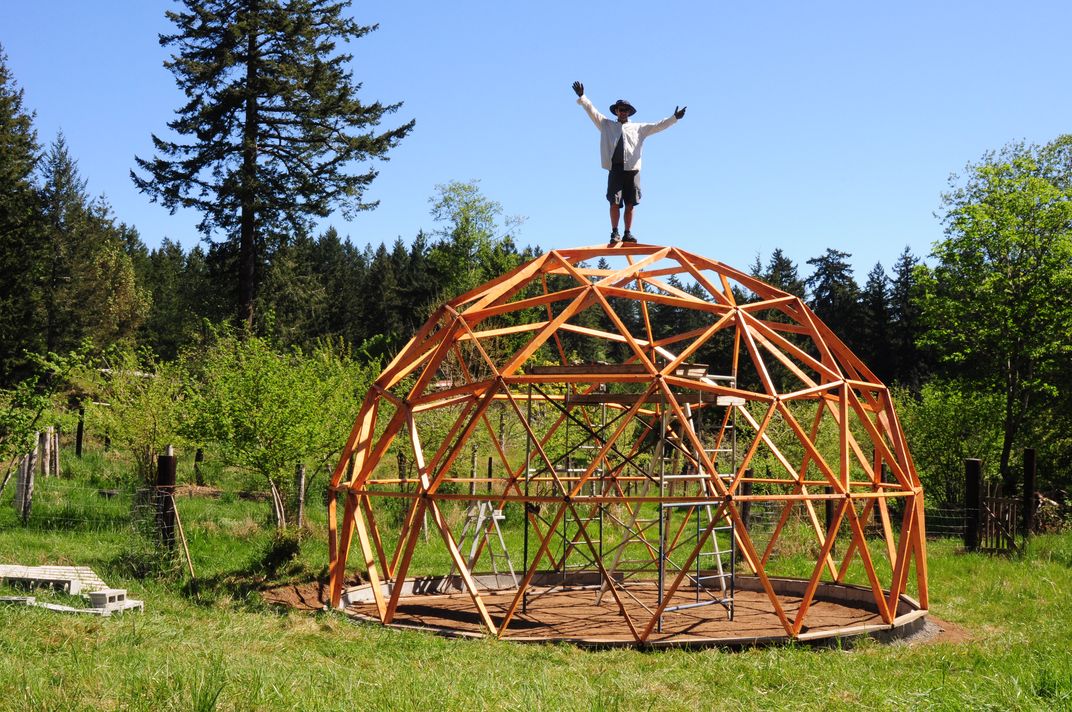
D.I.Y Geodesic Greenhouse Book Review

So you have built a few models, maybe even a full size geodome in your back yard as a tool shed or play house for the kids and now you are finally ready to grow some serious food! Well luckily my good friend Kacper has solved the biggest challenge already! How to actually build a 40′ geodesic dome greenhouse using using everyday materials you can buy at any lumber yard.

A $500 Geodesic Greenhouse Frame?

First a little about Kacper. He is the grandson of a master tomato gardener, has a lovely wife and an amazing little daughter who loves veggies! I guess gardening runs in Kacper’s blood because the moment he saw the potential of geodesic greenhouses he started building one.

That is one thing I admire so much about Kacper, he doesn’t wait around, he just goes and starts building! So after he created a small “test dome” he started pouring concrete for the foundation of a giant 40′ dome.

Kacper and His Daughter

While he was doing this so many people started bugging him about dome construction both online and off he finally wrote down (he can type at 80 words per minute too!) the exact methods he used to save over $16,000.00 on building his dome, how he cut the struts, how he planned his dome using free tools, in fact he did a complete brain dump of all his mistakes, challenges and ultimately exactly how to build your own geodesic greenhouse biodome.

Kacper’s book is called: Biodome Revolution and in it you will find not only very detailed instructions on how to actually build your own biodome but exact pictures of each step! Here are some more things he talks about in this amazing book:

  • The amazingly low cost involved. In fact you can build your own dome for pennies compared to the cost of normal green-houses using regular 2x4s from your local lumber yard.
  • How simple and inexpensive they are to heat. With proper design and covering you can have tropical temperatures, even in the dead of winter.
  • The amazing strength of the geodesic form. It is one of the strongest structures (being based on a sphere) in the world. Geodesic domes have withstood earthquakes, pretty much any amount of snow and hurricane force winds.
  • Geodomes are scalable. You can build to any size no matter what space you have to work with there is a dome that will work for you.
  • You can grow an incredible amount of fresh organic food inside your bio-dome, year round. (Here on the farm my dad picks fresh lemons every couple of days in the dead of winter!)
  • For the amount of growing space you get domes are incredibly light & transportable, because of this you can easily move them if needed. Depending on the size and where you live you probably don’t even need a permit to build a temporary structure, so can have your own whether you own land or are just renting!

Geodesic Greenhouse eBook

But don’t take my word for it. Go check it out yourself at: www.BiodomeRevolution.com, just as a heads up, this is a book you will need to buy and if you do end up buying it I will get a small percentage for sending you. BUT… before you click away in disgust, remember the book is 100% guaranteed by ClickBank and if you don’t like it for ANY REASON, you can return it for a full refund any time within 60 days. Even AFTER READING IT! How good is that?

I read the book. It was clear, concise and gave me more than enough information to build my own geodesic greenhouse biodome (which I will be doing this year and blogging about here).

Click here to check out Kacper’s site now.


3V Kruschke Greenhouse Dome and More

3V Kruschke Greenhouse Dome & More

model_kruschke_dome

There are many things to consider after you have finally decided to “pull the trigger” and build your own geodesic greenhouse from scratch. But before you do PLEASE build a model like this one (made from pipe cleaners and drinking straws).

Greenhouse Dome Size

The first of course is how big do you want your biodome to be? This is a function of ability, time, money and space. With unlimited amounts of all these the sky is literally the limit when it comes to the size of your greenhouse dome. However if you are like the rest of us you are severely limited on all or most of these. In which case it is wise to choose a dome a couple sizes smaller than you could afford if you “really stretched”, that way you will have an easier time with the build and have some money left over for greenhouse toys!

Geodesic Frequency

No this isn’t some new WiFi, or satellite radio station. It refers to the number, size and shape of the triangles you will use when you construct your biodome greenhouse. There are advantages and disadvantages of having a 3V, 4V or even a 2V frequency dome. The main two are that lower frequency domes have less struts to manufacture and are simpler to construct. The main disadvantage is that they also are less dome like because long straight struts don’t curve and make that nice “soccer ball” shape we all love.

The advantage of the higher frequency domes is they look fabulous and they use shorter struts so that means less fear when it comes to sourcing your materials. The disadvantage is the huge number of struts and the complexity of assembly.

Kruschke 3V Biodome

This brings us to an alternative option, the Kruschke 3V frequency. This is a slightly different mathematical formula and was developed in cooperation with Bucky Fuller back in the day. It combines some advantages of 4V (having a flat base) and 3V less struts and easier assembly. Here are some spy pics of a Kruschke greenhouse foundation I snapped the other day.

kruschke_geodesic_greenhouse_foundation

geodesic_greenhouse_cement_foundation

Biodome Basics

Hub system. This is key! Because now that you have decided to build your own backyard dome, you know how big and what frequency the next logical decision is how to connect the struts.

There are many pre-made strut systems, many home brew systems and many geodesic hub systems that just don’t work that well. And to add to the confusion, if you decide to build a Kruschke dome you need odd angled connectors which means you are almost guaranteed to have to do it yourself. You can do compound miter cuts and not use a hub system at all but when you realize how much math and fussy .5 degree accuracy angle cuts you have to make you might just give up.

For those of you making a PVC or conduit pipe geodome this is less of an issue but for those who like the look and feel of wood one needs another option. You can use a PVC pipe as a hub and screw dowels into the ends of your struts, you can try and modify various “off the shelf” systems to work. But what you really need is a simple, no frills, adjustable, forgiving and inexpensive connector system.

Luckily my friend Kacper has one and if I can talk him into letting me “spill the beans” I will do a post about it. If not I know it will be included in his new dome book coming out soon. So don’t give up, there is a solution for those who don’t do compound miter angle cuts but still would like a nice wooden frame for their DIY geodesic greenhouse!

To be continued…

Posted in Geodesic Dome Construction | Leave a comment

Wild Geodesic Dome Idea: Geotensic Dome

Wild Geodesic Dome Idea: Geotensic Dome

While wandering around on the world wide web I ran across a few different ideas for geodesic structures including greenhouses. This one from www.shelter-systems.com is a great way to get a different type of geodesic dome or greenhouse.

20_ft_geotensic_dome


This dome pictured above is really a temporary structure rather than a biodome or greenhouse. The company does offer other domes of various sizes that do work as “geodesic” greenhouses even though they are not really a geodesic structure; rather they are called geotensic by the manufacturer.

So what is geotensic? I wondered the same thing so a quick wiki search reveals: nothing. Huh? Then when I looked via Google I found that geotensic is actually a trademarked version of tensegrity which was coined by Bucky Fuller as a contraction “tensional integrity” in the 60′s. Here is an excerpt from Wikipedia:

Tensegrity, tensional integrity or floating compression, is a structural principle based on the use of isolated components in compression inside a net of continuous tension, in such a way that the compressed members (usually bars or struts) do not touch each other and the pre-stressed tensioned members (usually cables or tendons) delineate the system spatially.

tensegrity_structure

So what the folks over at Shelter systems have done is make a free standing geotensic structure that comes in two small packages and assembles in a few minutes to make a free standing geometric dome that is held up by tension between the frame and the cover.

geotensic_dome_detail


Here is a short passage from the Shelter Systems website:

Shelter Systems’ domes are based on tensegrity and geodesic design principles. We call them Geotensic™. They have the highest strength-to-weight ratio than any dome tent made of the same materials, making Shelter Systems’ domes strong, durable, lightweight, and highly portable. Shelter Systems’ domes are so compact and lightweight we can ship even our largest 31′ dome with UPS to anywhere in the world.

Shelter Systems’ domes gain their strength and simplicity and by combining tensegrity and geodesic design principles in their construction. Our structures incorporate tensegrity by having the poles not attached to each other except by the tension of the covering (the poles will not stand on their own without the covering and fasteners). Our structures are geodesic because the shape of the covering and that most of the poles follow the shortest line on a sphere. Geotensic™ structures make possible the greatest strength to weight possible in a self-supporting shelter.

So all this adds up to another great option for a backyard biodome greenhouse especially if you need to move often or prefer to have a biodome greenhouse that is portable, quick to set up and will last three full years (according to the manufacturer) in full sun.

Obviously if you are serious about building your own geodesic greenhouse for long term food production you would go with something more permanent. Something like the Eden Biodome System (see review here) which teaches even a complete novice to build their own backyard biodome and become food secure.

Posted in Biodome Greenhouse News | Leave a comment

Biodome Greenhouse Materials

Choosing Biodome Greenhouse Materials

wooden_geodesic_dome_materials

Thanks for the pic Dave!

 You’ve done your planning, decided on a location,considered options for foundations.Now it’s time to choose your geodesic greenhouse building material!  Now, If you did not use the below method with your previous building projects, don’t worry – it’s not like its the end of the world! But my suggestion is that you definitely try to employ the following method with any other domes that you build.

The Importance of Choosing Materials Wisely

Just jumping onto the “latest greatest” dome  building material bandwagon without looking at all  the options out there is NOT recommended! The simple fact is there are many options out there for construction of your dome and choosing well can
save you a ton of cash.

So lets look at some options and a few pros and cons of each one.

PVC Pipe

pvc_dome_connector

PVC stands for Poly Vinyl Chloride and it is generally used for water piping (irrigation, wells, septic fields, etc.).

Pros: This material is pretty inexpensive, commonly available and easy to work with. You can do the math grab some pipe, make a cutting jig and prep your  pipes with common hand tools. Another advantage is the fact that the pipe ends can actually become the  dome connectors. Commercially available PVC dome connectors are available but, especially for smaller domes not necessary. Resists bugs, rot and moisture.

Cons: High ecological cost. Made using fossil fuel. All plastic type materials have some issues generally due to becoming brittle over time due to extremes of cold or from ultraviolet damage. So if your biodome greenhouse is kept in use (warm) and the pipes are protected from UV this material could be a good choice.


Steel Pipe

conduit_dome_connector


Pros: By using galvanized electrical “conduit” piping  available at any big box home improvement store you  have access to a durable, strong and easily worked  material. Resists bugs, rot and mold.  This pipe is available in a number of diameters and comes in ten foot lengths so make sure your design is optimized for maximizing material out of a ten foot pipe. With steel pipe you don’t need dome connectors  because the pipe ends are, drilled and bolted together  thus becoming the dome connectors.

Cons: Medium environmental cost. May have been  recycled but also may have been processed by slave labor in the developing world. Heavy. Can be expensive.  Need specialized tools (hydraulic press) to flatten the  ends prior to drilling. You can do it with a hammer but  it is VERY hard work and easy to screw up. Steel can  rust so painting any areas that have been cut or drilled.

Bamboo

bamboo_geodesic_dome

Pros: Light. Renewable resource. VERY green. May be locally available (depending on location and climate). Very strong. Bamboo scaffolding used in Asian countries is often still standing after a hurricane has destroyed the steel building the scaffolding was being used to build! There are some ingenious domes being built using bamboo, either in whole pieces (treated like pipe) or split and almost woven together.

Cons: Can be hard to impossible to find locally. May  be very expensive to buy the required amount. Need specialized skill to build with it. All natural building  materials have “quirks” that can be overcome when you know what you are doing. But if you don’t…. it can get painful. Trust me I speak from experience. Bugs  can eat it. Again proper green treatment will keep  bamboo going strong for longer than we will be around.

Wood

kacper_geodesic_greenhouse_15


Pros: Wood is almost universally available. There is some kind of wood that can be used for building in  pretty much every place I have ever been. Green and renewable if harvested sustainably. Easy to work with. Lots of infrastructure already in place. Most  people know a carpenter who has tools skills etc. and can be leaned on as a resource. Tools are also readily available at many stores. Durable if done properly. Smells good and is a pleasure to work with!

Cons: Can rot so needs to be treated, luckily there are numerous environmentally sound ways to preserve  wood on the market now. May split, break, or otherwise fail. This can be almost entirely avoided by proper use of tools and by choosing sound wood in the first  place. Bugs can eat it. Again proper green treatment will keep wood solid for generations.

So there you have it. A few ideas of biodome greenhouse  building materials. Look at your needs, your budget and your ecological footprint before you choose your dome building material because once you have 80+ pieces of any material sitting in your garage its a bit late to change to change your mind!

Until next time happy biodome building!

Posted in Geodesic Dome Construction | Leave a comment

Amazing Urban Biodome Vertical Farm

Amazing Urban Biodome Vertical Farm

The Cubans had a problem. Well they had many problems actually but when I was reading about urban agriculture growing food without fuel due to the collapse of the Soviet Union was a big deal. How did they end up solving the problem (and becoming a world leader in sustainable organic farming at the same time)? Urban farming.

Ncuban_urban_greenhouse_agricultureow it’s 2013 and we ALL have a problem!

The Cubans got hit earlier than we did but the future is going to be hotter, wetter, drier and ever more dangerous to humanity and its ability to grow food. So what is the answer? Well one group out of Sweden is taking the potential global food crisis seriously and actually doing something about it.

Here is a brief bio from their website.

Plantagon – Feeding the City

“Plantagon International is active in the sector urban agriculture and is a global innovation leader in vertical farming. Plantagon’s vertical greenhouse minimizes the need for energy, water and pesticides. The negative environmental impact of the greenhouses is very low, and since the products are delivered directly to consumers in the city, the transportation costs are also minimized. The concept is simple and appealing: daily fresh organic vegetables delivered daily directly to consumers. No middle hands, no yesterday’s food. www.plantagon.com

geodesic_urban_farm


All I can say is WOW! This dome rocks my world. The spiral ramp contains the farming and the dome creates the environment to grow food in any urban environment. Note the car at the at the bottom left of the biodome for scale!

The true cost of our food is almost never calculated because of farm subsidies and the fossil fuel lobby. In fact here are ten reasons to eat locally grown, sustainable, organic food.

1. Exploitation of cheap laborer in the developing world to have cheap food. Bananas, pineapple, palm oil, etc.

2. Mechanized agribiz farming depletes the soil of nutrients and promotes erosion, so farms must expand as the soil depletes and ever more inputs of fertilizer, fuel and chemicals are needed.

3. The extinction and total control of seeds as Monsanto, Cargill and other agribiz giants promote GMO, terminator seeds and other planet destroying technologies in search of ever higher profits.

4. The rise of mono culture crops where the risk of catastrophic  crop failure is more and more likely as genetic diversity is reduced. Think Irish potato famine.

5. Air and water pollution from the by-products of massive food processing plants, commercial farms, and factory feedlots. Need we talk about global warming, dust storms and “dead zones” in coastal areas polluted by agri chemical run off?

6. Carbon emissions from the use of fossil fuels to keep all of the food system machinery moving; which leads to global climate change. Did you know that most commercial fertilizers are made from fossil fuel? Then transported by fossil fuel, then applied, harvested, transported and disposed of using fossil fuel too.

7. The rise of genetically modified products (GMO’s) threaten all wild plants and animals and have potentially unknown health effects on those consuming them.

8. Overproduction caused by commercial farming, commodities speculation, marketing boards, subsidies and vertical integration mean an overabundance of cheap food, which leads to wasted, unused food and overconsumption with the myriad of health problems we are all facing.

9. Food becomes less about nourishing people and more about profit while corporate lobby groups push even more bizarre food production laws. A while back the US tried to get the word “organic” reclassified to mean “anything that was grown”. Luckily it was not approved and organic still means something.

10. Everytime we buy this corporate agribiz produced food we are voting with our dollars so be careful how you shop! And better yet grow your own in a biodome!

geodesic_urban_farm_closeup


Take action! Build your own dome, help your friend build one, share the building of a biodome at your local community garden because every time you grow your own food, save seed and shop a the local farmers market you are refuting the points made earlier and moving toward a truly sustainable food system.

Posted in Biodome Greenhouse News | Leave a comment

Shrink Wrapped PVC 3V? Good Enough For Me!

Shrink Wrapped PVC 3V? Good Enough For Me!

PVC 3V biodomeOK So that might be a bit cryptic for the uninitiated but you have to admit its catchy! It refers to the the frequency (number and arrangement of the geodesic triangles) of the geodesic biodome greenhouse I am planning.


bolt geodome conector

I have decided on using PVC water pipe as the strut material and bolts at the connections rather than any of the commercial dome connectors available online. (Note the price for each connector! And for a “full” kit of connectors and pipes at over $500.00. Yikes!) That’s why I chose to go the DIY way. Plus its more fun!


This brings me to the latest information I have uncovered. When choosing a cover for ones dome there are many factors to consider. In my case and in many peoples, the prime consideration is cost. So the question I sought to answer was what material will have a decent half life, be easy to apply, waterproof light and cost effective? The absolute cheapest way of course is to salvage some used clear plastic off another greenhouse and drape it over your frame, weight it down with rocks and off you go. Cost: potentially free.

shrink wrapped buildingBut because I am a dyed in the wool geodome geek I wanted something a bit sexier than that and also I want to be able to easily move my greenhouse if needed. Plus I don’t want to mess around with dirty old plastic either. Bear in mind when growing in warm climates one needs a top vent and it will be harder to seal with the draped plastic cover. So… I chose to go with industrial shrink wrap! You may have seen this used on construction projects to protect workers doing exterior work on scaffolding. A fun thing I have seen in Europe is that the building under reconstruction is recreated on the shrink wrap so that when you walk down the street the building is “still there” even though it is completely covered.

clear_shrink_wrap Anyway the whole idea of shrink wrap got me excited because it should be relatively inexpensive, easy for the do it yourselfer and with some creativity should provide a double layer capability for insulation too. So when I spotted a phone number on a shrink wrapped boat I called up and got Hugh on the phone. Surprise! A nice guy running a one man show.

He said the clear shrink wrap will tighten up by 25% when heated with the applicator gun, seal to itself and last 5-7 years in direct sun. All for $125 bucks for a roll that would do my 8ft geodesic dome several times over. So when I finally get the frame built I will do a complete cover (except for the door and vent) of clear shrink wrap then use some spacer material along each strut and do another layer to make an insulating air gap. Viola! Waterproof, insulative, clear, light, fast AND sexy! The perfect cover for my little PVC 3V. The next question is should I buy my own heat gun or rent one? Stay tuned!

Posted in DIY Geodesic Greenhouse Project | Leave a comment

Simple Worm Compost Tubes – Add the Bio to BioDome

Simple Worm Compost Tubes – Add the Bio to BioDome

I love eat organic fresh food but when it comes to composting I admit it I am a bit lazy. So when I found this simple DIY worm composter for my biodome greenhouse or in your flower garden I was suitably impressed. “No more shoveling compost! Priceless.”

geodesic_greenhouse_worm_composter_idea

Its by Kellee Kimbro at www.yankodesign.com and what a nice simple solution to disposal of household waste it is! But as I don’t think this little gem is available at IkeaDepot yet I decided to build my own.

Start with a two foot piece of 4-6 inch PVC pipe, drill 3/4″ holes in the section that will end up being buried below ground to allow easy access to worms and other soil builders. Make sure to leave a few above ground ones for ventilation as well. Add a 1ft piece of rebar, copper pipe or what have you across wise under the worm holes to prevent the whole thing popping out of the ground when you are aggressively trying to take the lid off. (I speak from experience here!) Slice the top 3 inches vertically a few times with a hacksaw to make removing the cap easier then bury, install kitchen waste, cap and forget!

When the worms have done their magic then pull the whole thing out of the ground and move it a few feet away. By rotating your worm composter you improve the soil aeration, nutrient profile and biological activity as well as delivering rich organic material to the most biologically active layer of your garden. This simple composter will be a valuable addition to your biodome growing beds or even flower garden and your plants will thank you for it.

geodesic_greenhouse_worm_composter_idea_2

Of course this isn’t a viable composting solution for large scale farming or gardening but for those of us who like growing micro greens it is perfect! No more ugly black plastic composter or overflowing piles of maybe rotting maybe composting kitchen waste. Just a few small white caps near the plants that need the nutrients and the rest is being taken care of by natural systems.

I wonder if this might work on a larger scale for yard waste? Hmmmm…. and if one was opposed to plastic in the ground maybe use an old whiskey barrel or even cast one out of hyper tufa.

The main thing is to provide as close to an ideal media (oxygen, food source, temperature, light, etc.) for micro organisms to do the work of composting as fast as possible. In my experience if the conditions are right compost can be created in as little as one week. So don’t let lack of space, aesthetics or pure laziness stop you from doing your part for the environment and your garden. Go out and pick up the materials, assemble them and then sit back and let mother nature deliver pure rich compost right where it is most needed in your geodesic greenhouse, garden bed or flower pot!


Posted in Geodesic Greenhouse Growing | Leave a comment

DIY 3V PVC Geodesic Greenhouse Build – Part 1

DIY 3V PVC Geodesic Greenhouse Build

Part 1 – Decide, Plan, Buy!

The moment of truth! Its time to build my own biodome.


For the first build I am going to venture a little away from the wooden biodome greenhouse that my friend Kacper writes about in his book and go with poly-vinyl-chloride (PVC) pipe bolted together at the ends.

So to that end I did some more online research and consulted the excellent dome resource at www.desertdomes.com to help calculate the best use of materials. Essentially what I was trying to do was find a frequency (3V or 4V) that will make a reasonably “smooth” dome shape and yet also be kind to the pocket book!

With that in mind I chose 1″ schedule 40 PVC pipe in 10′ lengths. These are commonly available at any of the big home improvement stores or irrigation supply outlet for a much better price in my case. I priced it at the big orange store and each length was going to be $7.99 plus 12% tax then when I asked at the irrigation supply store they said $2.99 per 10′ pipe! So needless to say I shopped locally and will now act globally!

The guy at the irrigation supply shop was kind enough to cut the pipes to 10′ from the original 20′ so I could easily get them into my vehicle. I highly recommend this and maybe that is what the big box stores charge for; cutting the pipe in half! Anyway I got 55 pieces cut to length and loaded in the car. Then I told my wife Amy. ;)

These 10′ sections will be cut in to the 30 short, 55 medium and 80 long struts needed to create a roughly 8′ diameter 100sf 3v PVC biodome greenhouse. How’s that for a mouthful! Anyway, when doing this yourself make sure that whatever length struts you use, they fit your material as well as possible. Saves on clean up and saves PVC too!

The pipes shown here have a “bell end” which needs to be cut off. Again the helpful guy at the small store did this for me for no extra charge, though one could also specify plain end PVC pipe from the big box store. Make sure the measurements you use do not include the bell end or you will end up with half your pipes not being long enough! Also, because I am not going to use a hub system to connect the struts the measurements used for calculating the dome size will be from hole to hole rather than end to end of the pipe. I also picked up 60 2″ and 60 1.5″ 3/16 galvanized bolts, washers and nuts to make the connections where the struts come together.

Essentially the plan is to cut a radius in the end of the pvc to allow some bending and then drill and bolt the corresponding ends together to make the joints where one might normally use some type of commercially available hub connector or in Kacper’s case, compound miter cuts and zinc plated deck screws.

So, at long last I have decided to finally build my geodesic garden shed, play pen, rec room, yoga studio, bedroom, greenhouse. I have also planned the size using online tools, found a knowledgeable local supplier of materials, purchased my raw materials and even told my wife!

Coming soon…

DIY 3V PVC Geodesic Greenhouse Build – Part 2
Prepping the Materials

P.S. If you got something out of this post or the site, share it, pin it, tweet it or reblog it and help spread the biodome revolution!


Posted in DIY Geodesic Greenhouse Project | Leave a comment

Cold Weather Biodome Greenhouses For Sale or DIY?

Cold Weather Biodome Greenhouses For Sale or DIY?

geodesic greenhouse construction


The crisp smell of fall is in the air even though summer isn’t quite over yet, and with fall comes cold weather. So, can us North American types keep gardening even when the cold weather hits? The answer is a resounding YES! Of course there is the small matter of locating greenhouses for sale in your area, or ordering a kit or best of all building your own geodesic biodome greenhouse!

So, what’s involved with buying or building a geodome greenhouse and installing it in your backyard? Well, the main thing is planning! Grab all the information you can get, (see Recommended Reading), find a reasonably level area with decent sun exposure and get going.

In many cases if you are building smaller than 100sf then you may not need a building permit, however it is always best to find out before you build in urban or suburban areas. That being said, if you are out in the country there is often much less building code enforcement, however it is always a good idea to use a proven greenhouse dome design to avoid problems later.

Once you have your site picked out, your dome design, (4v, 3v, charter dome, etc.) figured out, and have ordered or prepared your own materials you will usually need some friends to give you a hand with a dome raising party.

Make sure you anchor the base of your dome well! Even though the geodesic shape can withstand incredibly harsh winds there are certainly concerns if you are, for instance, using pvc and greenhouse plastic for your dome. Using cardboard “Sono-tube” forms and “just add water” cement is a simple way to start out when building foundations. Or if you are more industrious you can make a complete ring foundation with insulation outside just don’t forget some pipes through for power and water!

Once you have the foundation level and ready then the fun really begins. Watching a dome come together is amazingly fulfilling because even when partially completed the geodesic shape is very strong and strangely peaceful to be inside.

Once your some frame is complete then you add your covering and north side insulation. For this there are many options including one of my favorites, papercrete! (A mixture of shredded paper sand and portland cement to create insulating cement.) You can then cover your dome with double layer greenhouse plastic, poly-kedar or even glass depending on the size.

Once your dome is up create some beds inside, add water storage on the north side to absorb solar heat during the day and give it off at night. An automatic vent system, min/max thermometer and even aquaponics if you want a complete self sustaining food system. Then when that is done you are ready to plant your cold weather greenhouse crops!

Talk to your local nursery and start out with things that are cold tolerant and then start pushing it as you learn how your particular greenhouse reacts. After you have tastes fresh, organic food you grew yourself you will never go back to imported stuff!

geodesic_greenhouse


So, if you have been putting off looking for geodome greenhouses for sale, ordering plans online or simply doing it yourself; remember it is much easier than you think and the sooner you start the sooner you will be on your way to food security!

Posted in Geodesic Dome Construction | Leave a comment

Summer Biodome Micro-Greens!

Summer Biodome Micro-Greens

You have heard about the people who died in Germany last year from eating tainted sprouts? No? Well it was a sad thing. As many people became very ill and a couple of older people actually passed away after eating commercially grown sprouts contaminated with E-Coli bacteria. Now if you do your own sprouts or have a strong immune system you would most likely be fine BUT…

Just to be on the safe side I thought I would spread the word about an amazing almost unknown, geodesic greenhouse crop that packs an crazy amount of nutrition into a tiny but super tasty package. This wonder food is most often referred to as micro-greens and consists of the seedlings of various leafy vegetables and greens which are harvested just after they grow their first true leaves. Unlike conventional sprouts which are grown in water, micro-greens are grown in specially prepared organic soil. Because they are the youngest and most vibrant portion of the plant they are both colorful and flavorful as well as being packed with vital nutrients.

Micro-greens make a great garnish for any kind of dish or as a wonderfully alkaline stand-alone salad, and because they are so cute they are a big hit with picky eaters and kids too. Here are some different types of veggies that you can grow as micro-greens in your geodesic biodome greenhouse this summer.


China Rose Radish: Strong peppery taste.

Purple Radish:
Mild radish flavor.
Black Radish:
Mild radish flavor.
Purple Kohlrabi:
Mild cabbage taste.
White Kohlrabi:
Mild cabbage flavor.
Red Cabbage:
Mild cabbage flavor.
White Cabbage:
Mild cabbage flavor.
Arugula:
Distinct arugula flavor.
Red Kale:
Very mild kale flavor.
Pak Choi:
Mild fresh flavor.
Turnip:
Light crisp flavor.

So there you have it, a simple, fast growing nutritious green that takes minimal water, care and can be added to meals, juiced or become a whole salad.

These greens work especially well with the longer days of summer here in the northern hemisphere, but they will grow all year round even in very low light conditions. The micro-greens, like sprouts, are mostly growing out of the energy in the seed so can be grown in almost pure sand with a bit of compost tea.

Also because micro greens grow so fast and take up such a small amount of space there is no weeding, almost no watering, no pruning, tying or even worrying about most pests. They can be grown in trays or racks in a vertical orientation thus allowing for “crop rotation” and allowing you to grow even more amazing, nutrient dense, live food in your  biodome greenhouse.

So even if you have been procrastinating, check out the eden biodome book review, grab the easy to follow eBook, build a small PVC 3V geo-dome and start feeding yourself and your friends and family starting this summer! It’s not to late to have those greens come rolling in even if you are planting in mid August.

Good luck and let the rest of us know how your summer biodome micro-greens garden works out!

Posted in Micro-Greens Biodome Revolution | 1 Comment

Survival Seed Bank: Is it Worth the Money?

Survival Seed Bank. Is it Worth the Money?

survival_seed_farm

Amy Planting on the Greenhouse Seed Farm


My parents run one of the largest non-hybrid, heritage, open pollinated seed farms in B.C. We are in the top three producers for www.SaltspringSeeds.com who sell all over the world but due to bureaucratic restrictions aren’t able to sell to the United States.

When I heard that, I was chuffed. Why you might ask? Well in the because of this website I get a ton of feedback from geodesic greenhouse and biodome enthusiasts from all over the world but mostly from the good ol’ USA! And lots of questions are about seeds! So when I realized that we couldn’t ship our seeds to the states because of red tape and politicians I had to do something about it.

After some searching around I found a company out of Thompson Illinois called Solutions from Science, they carry a whole range of survival, off grid, energy independence, post disaster, prepper type stuff including an amazingly compact seed storage system called the Survival Seed Bank.

The best thing about seeds is how small they are! In fact in about the same space as a 2 liter pop bottle you have enough seeds to grow an acre of nourishing, nutrient dense, organic food. Most seeds, including my parents I am sad to say, come in cardboard or paper wrappers. There is nothing wrong with this approach, as long as you are planting in a year or two but when you are planning to invest in seeds for a “rainy day” or other long term reason vacuum sealed in foil like the astronauts do is the way.

So, if you are are looking to improve your survival odds after your stored food (we aren’t die-hard preppers here on the farm, but we have on average a years food stockpiled not counting what’s growing!) then you owe it to yourself and your family to check out the Survival Seed Bank Website. Don’t let the “doom and gloom” end of the world stuff get you down!

Focus on the seeds! Buy the seeds! You only have to do it once! In this case when you order the survival seed bank you actually get a book on how to save your own seed so that you never need to buy seeds again! My parents are living proof of this. We eat non-stop amazing, veggies, fruit, lemons (from the biodome greenhouse), save seeds for next year and still sell over $20,000.00 worth of seeds each year! Nature is amazing that way. So if you work with nature/family/community, keep your soil healthy, keep your biodome greenhouse warm and have a survival seed bank hidden away in case it all goes wrong you are about as safe as you can be in these troubled economic times. Get your seeds now and keep growing!

Posted in Uncategorized | Leave a comment